Table of Contents
ToggleOne wall kitchen layouts pack all the essentials, sink, stove, refrigerator, counter space, along a single straight run. They’re the workhorse layout for studios, small apartments, and open-concept homes where square footage is precious and every inch counts. If someone’s staring at a narrow galley space or a wide-open loft that needs defined zones without closing things off, a one wall design might be the smartest move. This guide walks through what makes a single wall kitchen work, when it’s the right call, and how to design one that’s efficient, good-looking, and doesn’t feel like cooking in a hallway.
Key Takeaways
- A one wall kitchen layout arranges all appliances, cabinets, and countertops along a single straight wall, maximizing space efficiency in studios, small apartments, and open-concept homes.
- This design saves on cost and materials with fewer cabinets, reduced plumbing runs, and simplified installation compared to L-shaped or galley layouts.
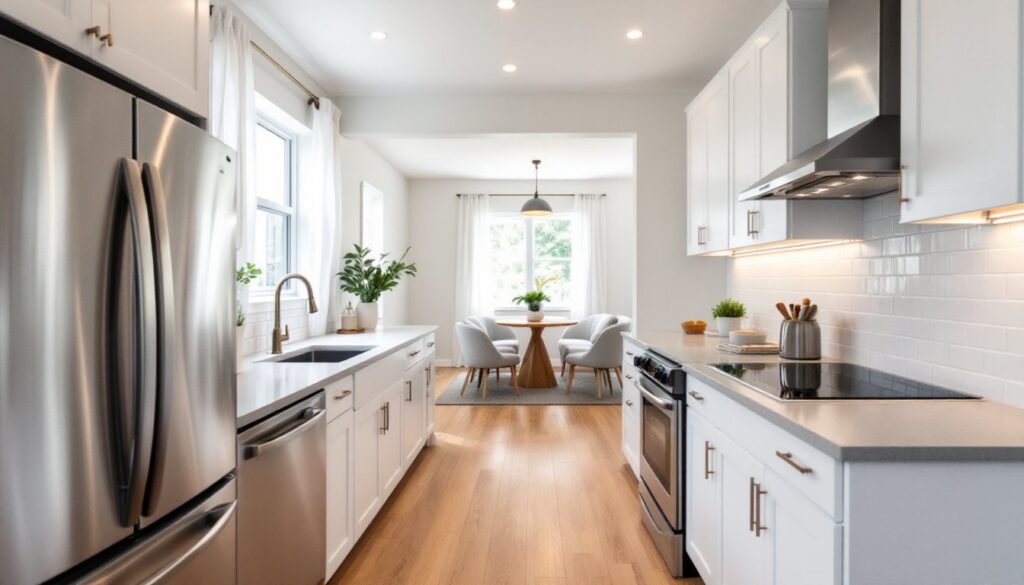
- The ideal appliance sequence is refrigerator, prep counter, sink, cooktop, and plating area to minimize backtracking and streamline workflow for one or two cooks.
- One wall kitchen designs benefit from light colors, reflective surfaces, task lighting under cabinets, and vertical storage solutions to counteract the narrow, tunnel-like appearance.
- Common mistakes include skipping backsplashes, undersizing ventilation hoods, placing the refrigerator in the middle of the run, and ignoring proper electrical outlet distribution.
- Adding an island to a one wall kitchen layout introduces secondary prep space, extra storage, and improved workflow without disrupting the linear design’s efficiency.
What Is a One Wall Kitchen Layout?
A one wall kitchen layout arranges all appliances, cabinets, and countertops along a single straight wall. No turns, no corners, no opposite-facing cabinets. Everything runs in a linear path from one end to the other.
This layout typically includes a refrigerator on one end, a range or cooktop in the middle, and a sink positioned between them. Upper and lower cabinets span the wall, providing storage and work surfaces in a compact footprint. Total length usually ranges from 8 to 12 feet, though tighter or wider configurations exist depending on available space and appliance sizes.
Some homeowners add a single wall kitchen with island when floor space allows. The island introduces a secondary prep zone, extra storage, and seating without disrupting the linear flow. This hybrid approach works well in studio apartments, basement kitchenettes, or open-plan spaces where the kitchen shares square footage with living or dining areas.
One wall designs differ from galley kitchens, which feature parallel counters on opposite walls. They also contrast with L-shaped or U-shaped layouts that wrap around corners. The defining trait is simplicity: one continuous run handles all kitchen functions.
Key Advantages of a One Wall Kitchen Design
Space efficiency tops the list. A one wall kitchen design claims minimal square footage, leaving more room for living areas, dining tables, or home offices. In a 600-square-foot studio, saving 30 to 40 square feet by skipping a second counter run can make the difference between cramped and comfortable.
Cost savings follow closely. Fewer cabinets, less countertop material, and a single plumbing run reduce material and labor expenses. A standard 10-foot one wall kitchen might require 8 to 10 linear feet of base and wall cabinets, compared to 16 to 20 feet for an L-shaped layout. Plumbers and electricians charge less when all hookups land on one wall instead of routing pipes and conduit across the room.
Open sightlines benefit modern floor plans. Without upper cabinets on opposing walls, the cook faces the living area, making conversation easier during meal prep. This setup suits hosts who don’t want to turn their back on guests while chopping vegetables or stirring pots.
Simplified workflow works for solo cooks or couples who rarely share kitchen tasks simultaneously. One person moves left to right, grab ingredients from the fridge, prep on the counter, cook at the range, clean at the sink, without crossing paths or bumping elbows. For households with multiple cooks, this becomes a drawback, but for one or two users, it’s streamlined and intuitive.
Accessibility improves for users with mobility challenges. A linear path eliminates the need to navigate corners or reach across wide galley gaps. Wheelchairs and walkers maneuver more easily when all fixtures align along a single plane.
When a One Wall Kitchen Works Best
Small apartments and condos benefit most. When the kitchen occupies a narrow alcove or a single wall of a studio, there’s no room for multiple counter runs. A one wall layout maximizes usable space without creating bottlenecks.
Open-concept living areas pair well with this design. In loft-style homes or modern builds where the kitchen, dining, and living zones share one large room, a single wall kitchen defines the cooking area without blocking views or closing off space. Adding a one wall kitchen layout with island enhances functionality while maintaining the open feel.
Basement or accessory dwelling unit (ADU) kitchens often adopt this layout. When building a rental suite, in-law unit, or finished basement, simplicity and budget constraints favor a compact footprint. Running plumbing and electrical along one wall reduces installation complexity and cost.
Vacation homes or secondary kitchens work well here too. Cabins, beach houses, and lakefront retreats don’t need full-scale culinary setups. A straightforward single wall design covers the basics, coffee, breakfast, simple dinners, without over-investing in a space that sees seasonal use.
Tight urban infill lots with narrow floor plans force the issue. Rowhouses, brownstones, and shotgun-style homes often have limited width. A one wall kitchen fits naturally into these constraints, preserving circulation space for hallways and stairs.
This layout doesn’t work for serious cooks who need extensive prep zones, multiple workstations, or commercial-grade appliances. It also struggles in households where two or more people cook together regularly. Limited counter space and a linear path mean one person waits while the other occupies the range or sink.
Essential Design Tips for One Wall Kitchens
Prioritize the right appliance sequence. The classic order, fridge, prep counter, sink, cook surface, plating counter, minimizes backtracking. A cook pulls ingredients from the fridge, preps them on the adjacent counter, washes produce at the sink, cooks at the range, and plates finished dishes on the final stretch. Reversing this order or placing the sink at one end forces unnecessary steps.
Choose compact, high-efficiency appliances. A 24-inch or 30-inch refrigerator saves space without sacrificing capacity. Drawer-style dishwashers fit under counters where full-size models won’t. Induction cooktops with 18-inch or 24-inch widths work in tight runs, and convection microwaves double as ovens when wall oven space isn’t available.
Extend countertops beyond base cabinets where possible. An overhang creates a breakfast bar or casual dining spot without adding a separate table. A 12-inch to 15-inch overhang accommodates standard bar stools and provides knee clearance. Reinforce the overhang with corbels or steel brackets rated for the countertop material, granite and quartz weigh 18 to 20 pounds per square foot.
Use light colors and reflective surfaces to counteract the tunnel effect. White or pale gray cabinetry, quartz or marble countertops, and glossy tile backsplashes bounce light and make the space feel larger. Matte black or dark wood cabinets absorb light and can make a narrow kitchen feel cave-like unless natural light floods the room.
Install task lighting under upper cabinets. LED strip lights or puck lights eliminate shadows on work surfaces. A single overhead fixture won’t cut it, countertops directly beneath upper cabinets stay dim without dedicated task lighting. Aim for 300 to 500 lumens per linear foot of counter space. Many kitchen design resources recommend layering ambient, task, and accent lighting for balanced visibility.
Maximizing Storage in a Linear Kitchen
Floor-to-ceiling cabinetry captures vertical space that standard 30-inch or 36-inch uppers miss. Extending cabinets to 42 inches or full ceiling height adds 30% to 50% more storage. Use the top shelves for seasonal items, serving platters, or small appliances used infrequently.
Pull-out organizers and drawer inserts improve access. Base cabinets with fixed shelves waste space and make items in the back unreachable. Install pull-out trash bins, spice racks, and tiered drawer organizers to maximize usable volume. A 24-inch-wide base cabinet with pull-out trays holds as much as a 36-inch cabinet with fixed shelves.
Corner solutions apply only if the one wall kitchen turns at the end. If the layout stays strictly linear, corners aren’t an issue. But if it transitions into an L-shape, install a lazy Susan or swing-out organizer to avoid dead space.
Open shelving works for frequently used items like plates, bowls, and mugs. Floating shelves cost less than upper cabinets and keep essentials within arm’s reach. They don’t suit homes with excessive dust or grease buildup from heavy frying. Dishware on open shelves requires regular washing even when not used.
Integrated appliance garages hide toasters, blenders, and coffee makers behind tambour doors or lift-up panels. This keeps counters clear without losing appliance access. A 24-inch-wide appliance garage fits two or three small machines and integrates flush with surrounding cabinetry.
Optimizing the Work Triangle
The classic kitchen work triangle, the path connecting sink, stove, and refrigerator, collapses into a straight line in a one wall layout. Traditional guidelines call for 12 to 26 feet of total triangle perimeter with no single leg exceeding 9 feet. A one wall kitchen can’t meet these standards because all three points sit on the same axis.
Instead, focus on minimum spacing between work zones. Place at least 24 inches of counter space between the sink and range to prevent splashing water on hot burners. Position the refrigerator 36 to 48 inches from the sink so two people can access both without colliding. Many designers reference professional kitchen layouts to balance spacing and functionality.
A one wall kitchen with island restores some triangle functionality. The island acts as a secondary prep zone or houses the sink or cooktop, creating a two-point work path. If the island holds the sink, plumbing and electrical must be routed through the floor, this requires cutting into joists and may need permits depending on local codes (check IRC Chapter 8 for plumbing rough-in requirements).
Avoid placing the range or cooktop at the far end of the run. Cooks instinctively center their activity near the stove, and an end-mounted range leaves no counter space on one side for pot rests, spoon holders, or plating. Position the range near the middle, with at least 18 inches of counter on each side.
If space allows, a 36-inch or 42-inch prep sink on an island reduces foot traffic along the main wall. The cook washes vegetables or drains pasta at the island while someone else accesses the fridge or main sink without interference.
Common Mistakes to Avoid with One Wall Kitchen Layouts
Skipping a backsplash leaves drywall vulnerable. Even a small kitchen generates grease splatter, water spray, and steam. Install a 4-inch backsplash minimum behind the sink and range, or run tile, stone, or metal panels from counter to cabinet bottom. Full-height backsplashes between base and wall cabinets simplify cleaning and protect walls from long-term damage.
Undersizing the range hood or skipping ventilation altogether. A one wall kitchen often sits in an open living area, so cooking odors and smoke spread quickly. Install a ducted range hood rated for at least 100 CFM (cubic feet per minute) per linear foot of cooktop width. A 30-inch range needs a 300 CFM hood minimum. Ductless hoods with charcoal filters work in spaces where exterior venting isn’t possible, but they’re less effective. Many remodel guides emphasize proper ventilation as a non-negotiable upgrade.
Placing the refrigerator in the middle of the run disrupts workflow. Refrigerators see the most traffic, opening the door multiple times during meal prep and throughout the day. Positioning it centrally blocks access to the sink and range. Anchor the fridge at one end so its door swing doesn’t interfere with the work zone.
Ignoring counter depth. Standard base cabinets measure 24 inches deep, but refrigerators and ranges often protrude 28 to 30 inches. This creates an uneven front line and reduces walkway clearance. Specify counter-depth appliances (typically 24 to 25 inches deep) for a flush, streamlined look. They cost 15% to 20% more but prevent appliances from jutting into pathways.
Overlooking electrical outlet placement. Building codes (NEC 210.52) require outlets every 48 inches along countertops and within 24 inches of each counter section. In a one wall kitchen, this typically means four to six outlets. Don’t cluster them all near the range or refrigerator, distribute them evenly so small appliances (mixer, toaster, coffee maker) can plug in anywhere without extension cords.
Choosing cabinet hardware that protrudes too far. Knobs and pulls that extend 2 inches or more from drawer and door fronts catch clothing, bags, and elbows in tight spaces. Opt for recessed pulls, edge pulls, or slim bar handles that sit closer to the cabinet face.
Failing to plan for future flexibility. A one wall kitchen limits expansion options. If the household grows or cooking needs change, adding more counter space or appliances requires major renovation. Design with adaptability in mind, leave room for a future island, specify cabinet interiors that accept adjustable shelves, and run extra electrical circuits during construction even if they’re not immediately used. Future upgrades cost less when the infrastructure is already in place.