Table of Contents
ToggleInstalling a walk-in shower transforms a dated bathroom into a clean, modern space, and it’s a project more homeowners are tackling themselves. Whether you’re converting an old tub or building a new enclosure from scratch, this guide walks through the materials, tools, and step-by-step process for a successful DIY walk-in shower installation. Expect honest talk about what takes skill, what requires a permit, and where calling a pro makes sense. If you’re handy with basic construction and willing to invest the time, building a walk in shower is absolutely doable.
Key Takeaways
- Walk-in shower installation is achievable for handy DIYers when you plan thoroughly, reuse existing drains when possible, and choose a curbed design with a pre-formed base for your first project.
- Waterproofing is the critical step in walk-in shower installation—rushing this stage leads to mold, rot, and expensive repairs, so follow two coats, full seam coverage, and proper dry times without exception.
- DIY walk-in shower installation costs $1,500–$4,000 in materials, significantly less than contractor work, but factor in equipment rentals, permits ($100–$300), and 10–15% waste contingency.
- Avoid common failures by checking level and plumb constantly, using the correct thinset for your membrane type, sloping floors 1/4 inch per foot toward the drain, and testing for leaks before tiling.
- A pre-formed shower base with backer board walls and tile simplifies walk-in shower installation compared to custom mortar pans, making it the better choice for first-time DIYers.
- Exhaust ventilation, 100% silicone caulk at seams, and knowing when to hire a professional for plumbing rough-in or complex designs ensure long-term durability and protect resale value.
Planning Your Walk-In Shower Installation
Before buying a single tile or mixing any mortar, plan the entire scope of the project. Walk-in showers vary wildly in complexity depending on whether you’re replacing an existing shower, converting a tub, or creating a new enclosure where none existed.
Start by measuring the available space. A comfortable walk-in shower needs at least 36 inches by 36 inches of floor space, though 48 by 48 inches is better if you have the room. Check local building codes, some jurisdictions require minimum dimensions, specific drain sizes, or particular waterproofing methods. Most walk-in shower projects fall under plumbing and electrical permits if you’re moving drains or adding new fixtures.
Next, decide on the shower type. Curbless (zero-entry) designs look sleek and work well for accessibility, but they require precise floor slope (typically 1/4 inch per foot toward the drain) and sometimes subfloor modifications. Standard curbed showers are simpler to waterproof and contain water better, making them a better choice for a first DIY project.
Consider your existing plumbing. If the drain is already in the right spot, you’ll save hours of work and potential headaches. Moving a drain means cutting into the subfloor, re-routing pipes, and possibly dealing with joists. That’s not impossible, but it adds time and complexity. A tub-to-shower conversion often lets you reuse the existing drain location.
Budgeting and Cost Considerations
A DIY walk-in shower typically costs $1,500 to $4,000 in materials, depending on tile choice, fixtures, and whether you need new plumbing. That’s significantly less than hiring a contractor, where total project costs often run $3,500 to $10,000 or more.
Here’s a rough material breakdown:
- Shower pan or mortar bed kit: $200–$600
- Waterproofing membrane (liquid or sheet): $100–$300
- Tile (12-inch porcelain, mid-grade): $3–$8 per square foot
- Thinset and grout: $75–$150
- Shower valve and trim kit: $150–$500
- Glass door or panel (if not going doorless): $400–$1,200
- Drain assembly: $50–$150
Budget an extra 10–15% for waste, mistakes, and the specialty tool you realize you need halfway through. Tile saws, mortar mixers, and notched trowels add up quickly if you don’t already own them. If you’re converting from a tub, factor in demolition, removing an old cast-iron tub and tile surround is pure labor.
Don’t forget the hidden costs: subfloor repair if you find rot, upgraded plumbing if old galvanized pipe is involved, and a second pair of hands for setting a heavy shower base or hanging cement board. Many municipalities charge $100–$300 for plumbing permits.
Essential Materials and Tools You’ll Need
Walk-in shower installation requires both standard carpentry tools and some specialty plumbing and tile gear. Borrowing or renting the expensive stuff makes sense if this is a one-time project.
Materials list:
- Cement backer board (1/2-inch thickness, such as Durock or Hardiebacker)
- Waterproofing membrane (RedGard, Kerdi, or equivalent)
- Shower pan (pre-formed acrylic or fiberglass) or mortar bed kit for a custom pan
- PVC or ABS drain assembly compatible with your pan
- Tile (porcelain or ceramic: porcelain is denser and better for floors)
- Thinset mortar (unmodified if using Kerdi, modified otherwise)
- Grout (epoxy or urethane for wet areas)
- Silicone caulk (100% silicone, mold-resistant)
- Galvanized screws or cement board screws (1-1/4 inch)
- Fiberglass mesh tape (for backer board seams)
- Shower valve and trim kit (pressure-balancing or thermostatic)
Tools you’ll need:
- Circular saw or jigsaw (for cutting backer board)
- Tile saw (a wet saw with a diamond blade: rentals run about $50/day)
- Notched trowel (1/4-inch square-notch for walls, 1/2-inch for floors)
- Margin trowel and grout float
- Level (a 4-foot level is essential)
- Tape measure and carpenter’s pencil
- Utility knife with fresh blades
- Drill/driver with bits for cement board and tile
- Mixing paddle for thinset (attaches to drill)
- Bucket for mixing mortar
- Safety glasses, dust mask, and work gloves
- Knee pads (you’ll be on the floor a lot)
If you’re doing a curbless shower or custom mortar pan, add a mortar mixer, sloped foam panels, and a membrane roller to the list. Installing a walk in shower with a pre-formed base is much faster and more forgiving for first-timers.
Step-by-Step Walk-In Shower Installation Process
This section covers the core sequence for a standard curbed walk-in shower with a pre-formed base, backer board walls, tile, and a swinging glass door. Adjust as needed if you’re building a custom pan or going curbless.
1. Demo and Prep
Strip the existing shower or tub surround down to studs. Remove old tile, drywall, and any damaged or moldy material. Inspect the subfloor, if it’s soft, spongy, or water-stained, replace it with 3/4-inch exterior-grade plywood. Check that studs are plumb and properly spaced (16 inches on center is standard). Add blocking between studs at 48 inches height for grab bars or bench support, even if you’re not installing them now.
Rough in your plumbing. The shower valve should sit at about 48 inches above the finished floor (adjust for personal preference). The showerhead arm typically sits around 78 to 80 inches. Make sure the drain is in the right spot for your pan, most pre-fabricated shower bases have the drain offset to one side or centered. Secure all supply lines and test for leaks before closing up walls.
Install the shower valve according to manufacturer specs. Most valves have a depth gauge or require a specific setback from the finished wall surface. Get this right now, because you can’t adjust it once tile is up.
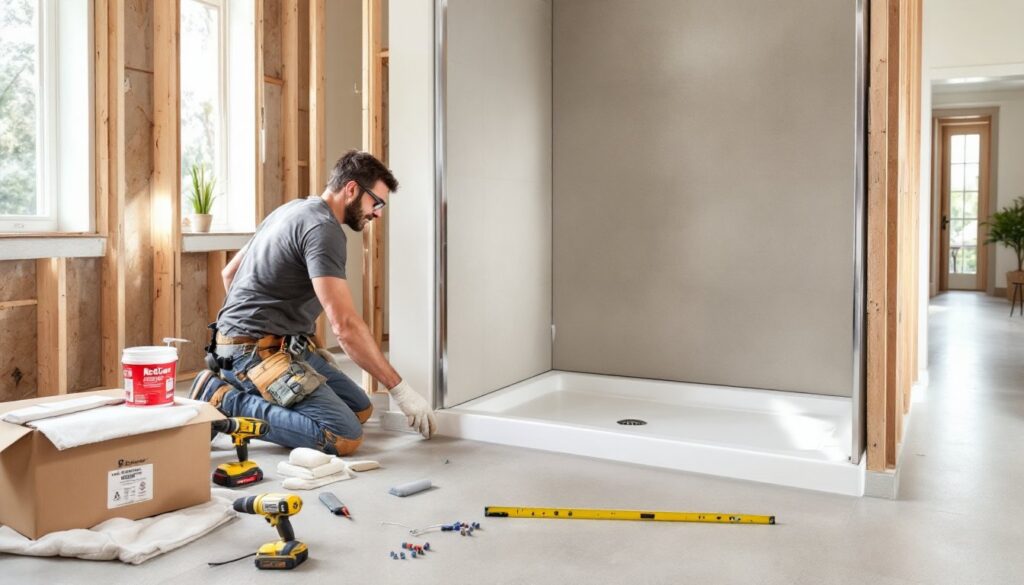
2. Set the Shower Base
Dry-fit the shower pan to confirm it fits and the drain aligns. If using a mortar bed under the pan (recommended for stability), mix a batch of mortar or thinset to a peanut-butter consistency and trowel it onto the subfloor. Set the pan in place, press down firmly, and check it for level in all directions. Some pros use shims: others prefer a full mortar bed for better support.
Attach the drain assembly per the instructions. Most use a rubber gasket, a compression ring, and a locknut. Tighten snugly but don’t overtighten and crack the pan. Double-check that the drain is sealed and level with the pan surface.
Preparing the Shower Base and Drainage
Getting the base and drainage right is non-negotiable. A leaking shower destroys subfloors, joists, and ceilings below. After setting the pan, test the drain by pouring several gallons of water into the base and checking below for drips. Fix any issues now, not after tile is installed.
If you’re doing a mortar bed instead of a pre-formed base, you’ll need a vinyl liner or hot-mop membrane under the mortar, sloped at 1/4 inch per foot toward the drain. This is advanced work: a pre-sloped foam kit (like those from Schluter or similar systems) simplifies the process. Many DIYers choose pre-formed pans to avoid this complexity.
3. Install Backer Board on Walls
Cut cement backer board to size using a utility knife (score and snap) or a circular saw with a carbide blade (wear a dust mask, cement dust is nasty). Hang the board with the rough side facing out, starting 1/4 inch above the shower pan lip to prevent wicking. Fasten with galvanized or cement board screws every 8 inches into studs.
Cover seams with fiberglass mesh tape and a thin layer of thinset. Pay special attention to corners, inside corners get tape folded along the crease, outside corners may need a bead of thinset or metal edge trim.
Waterproofing and Tile Installation
Waterproofing is the most critical step. Even one pinhole leak leads to mold and rot. Apply a liquid membrane like RedGard with a paint roller or brush, covering all backer board surfaces, seams, screw heads, and corners. Most products require two coats with 2–4 hours of dry time between. Extend the membrane at least 6 inches past the shower area on all sides.
Alternatively, use a sheet membrane system like Schluter Kerdi. This involves thin-setting the membrane directly to the backer board, then overlapping and sealing seams with Kerdi band and corners with pre-formed pieces. Sheet membranes are faster and beloved by tile pros, but they cost more.
Once waterproofing is cured (check manufacturer dry times, usually 24 hours), start tiling. Mix thinset mortar to a smooth, lump-free consistency. Use unmodified thinset with Kerdi: modified thinset with RedGard or plain backer board.
Start with the shower floor if using individual tiles. A 1/2-inch square-notch trowel works well. Lay tiles with slight gaps (usually 1/8 inch) and use spacers. For walls, start at the bottom and work up in rows, checking level frequently. Cut tiles with a wet saw, and use a grinder or nippers for notches around fixtures.
Allow thinset to cure for 24–48 hours, then grout. Urethane or epoxy grout resists mold and stains far better than traditional cement grout. Mix small batches, spread with a grout float at a 45-degree angle, and wipe away excess with a damp sponge. Let grout cure fully before use, typically 72 hours.
4. Install Fixtures and Door
Install the shower trim kit (handle, showerhead, tub spout if applicable) per instructions. Use plumber’s tape on threads and a thin bead of silicone behind any escutcheons to seal against the tile.
If installing a glass door, measure carefully, most frameless or semi-frameless doors require precise openings. Anchor the door frame into studs or blocking, not just tile. Use clear silicone along the bottom track and any fixed panels.
Run a bead of 100% silicone caulk along all seams where tile meets the pan, corners, and around fixtures. Caulk is your last line of defense against water intrusion.
Common Mistakes to Avoid During Installation
Even experienced DIYers make mistakes on tile and plumbing projects. Here’s what to watch out for:
Skipping or rushing waterproofing. This is the #1 killer of shower projects. If you cut corners here, you’ll have mold, rot, and an expensive teardown within a year. Follow product instructions to the letter, two coats, proper dry times, and full coverage.
Not checking for level and plumb. A shower base that’s off-level will pool water in corners. Walls that aren’t plumb make tile layout a nightmare and doors won’t seal right. Check constantly with a 4-foot level.
Using the wrong thinset. Modified thinset with Kerdi membrane won’t cure properly and can fail. Unmodified thinset with some other systems won’t bond well. Read the instructions for your waterproofing product and use the specified mortar.
Inadequate slope on the shower floor. If water doesn’t flow toward the drain, you’ll have standing water and soap scum buildup. Pre-formed bases come sloped, but if you’re doing a custom mortar bed, double-check that 1/4-inch-per-foot slope in all directions.
Forgetting expansion joints. Tile expands and contracts with temperature. Use caulk, not grout, where tile meets different materials (pan lip, corners, fixtures). Grout will crack: caulk flexes.
Poor tile layout. Start with a dry layout before spreading any thinset. Avoid tiny slivers of tile in corners, adjust your starting point so cuts are at least half a tile wide. Symmetry matters: center your layout on the most visible wall.
Overtightening the drain or fixtures. Acrylic and fiberglass shower bases crack easily. Snug is good: gorilla-tight is bad. Same with valve trim, don’t strip threads or crack tile by overtorquing screws.
Ignoring ventilation. Even a perfectly waterproofed shower needs airflow to prevent mold on grout and caulk. Install an exhaust fan rated for your bathroom size (typically 50–80 CFM for an 8×10 bath), and run it during and after every shower. This ties into broader bathroom remodeling best practices that pros follow.
Not testing before closing walls. Turn on the water, check for leaks at the valve and drain, and let it run. Inspect below if possible. Finding a leak now takes minutes to fix: finding it after tile is up takes days and hundreds of dollars.
Finally, be realistic about skill level. If you’ve never done plumbing or tile work, consider hiring a plumber for the rough-in and valve install, then handling the tile yourself. Similarly, if your project involves moving drains, cutting joists, or complex custom shower designs, bring in a pro for at least a consult. Permits exist for a reason, and failed DIY projects can affect resale value and insurance claims.